Monday, December 28, 2009

Export of SSRS reports to PDF generates extra blank pages.


In Reporting Server you have the option to export your reports to PDF. This works fine however sometimes extra blank pages are generated. For instance, the reports is rendered on your screen on 3 pages. After exporting to a PDF file you got a file with 6 pages. After every printed page with content you goy an empty page. This is caused by the fact that the width size of the body of the report must be less or equal to the width size of the report minus the sum of the left and right margins.

 Retrieve the body properties of a report:
  • Enable the properties window. (In Visual Studio, View, Properties Window)
  • Click on the body of the report. The property window will now display the size of your body.  


Retrieve the report properties of a report:
Click on the gray area outside the report. The property window will now display the size of your report.


In this example the width size of the body is 19.7 cm. The report width is 21 cm. The left margin of the report is 0.635 cm and the right margin of the report is 0.635 cm. To avoid an extra printed pages in the exported PDF file next formula is used.

width size of the body + left margin of the report + right margin of the report <= report width
In this example: 19.7 + 0.635 + 0635 < 21
Yes that's the case because 20.97 <= 21

Enjoy exporting your SSRS reports to PDF.

Sunday, December 27, 2009

SQL Azure Migration Wizard. BCP upload process failed: SQLState = 37000, NativeError = 40531


In SQL Azure the BACKUP and RESTORE functionality is not available. This makes it a little bit more complex to transfer existing data to the SQL Azure database. A way to upload data to SQL Azure is using BCP. The SQL Azure Migration Wizard makes use of BCP to upload your data. The SQL Azure Migration Wizard helps you migrate your local SQL Server 2005 / 2008 databases into SQL Azure. The wizard walks you through the selection of your SQL objects, creates SQL scripts suitable for SQL Azure, and allows you to migrate your data from:
  • SQL to SQL Azure
  • SQL Azure to SQL
  • SQL Azure to SQL Azure.


This tool can do a lot. A nice screen cast in which the author: George Huey explains what the tool can do can be found here:

I practise with this tool and could create the SQL objects, like tables very easy. The migration wizard can also check your scripts for compatibility issues with SQL Azure. However the upload of data always failed with next error message:

Process starting ...
-- Success: CREATE NONCLUSTERED INDEX [JournalStatusEntryGuid] ON [dbo].[amutak] ...
Uploading data to "Deltabike.dbo.amutak
*
*****
Sorry, but BCP upload process failed:
SQLState = 37000, NativeError = 40531
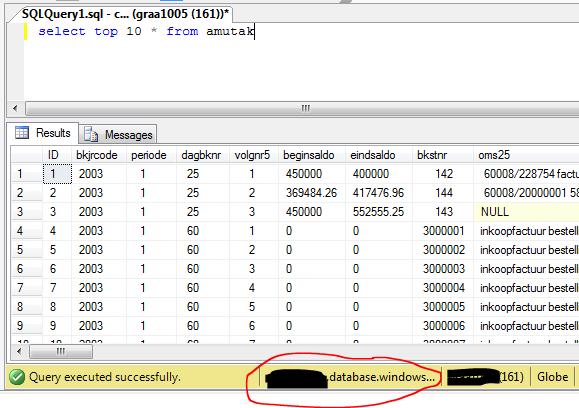
Error = [Microsoft][SQL Server Native Client 10.0][SQL Server]Server name cannot be determined. It must appear as the first segment of the server's dns name (servername.database.windows.net). Some libraries do not send the server name, in which case the server name must be included as part of the user name (username@servername). In addition, if both formats are used, the server names must match.

This error can be solved if you specify also the servername after the login name. @
instead of only


Enjoy uploading your data to SQL Azure.

Thursday, December 24, 2009

Query to retrieve missing indexes (suggestions) and existing indexes of a table in one resultset.


Performance of your application can change over time. This can have various reasons like:
  1. New functionality added to the product.
  2. Changes in the implementation of the product.
  3. Customer specific usage.
Because of these reasons it can happen that the current index structure is not optimal. Some new indexes are needed to create and some indexes can be dropped because they are not used. For index suggestions and index usage statitstics you can run seperate queries. However analyzing 2 different resultsets is not always easy. Download next query to combine both results sets in one resultset.


Have fun in optimizing your index structure.

Tuesday, December 22, 2009

Getting Started with SQL Azure, create your first SQL database in the cloud.


Microsoft® SQL Azure™ Database is a cloud-based relational database service built on SQL Server® technologies. As said by Microsoft SQL Azure should:
  1. Provide a highly available, scalable, multi-tenant database service hosted by Microsoft in the cloud. SQL Azure Database helps to ease provisioning and deployment of multiple databases.
  2. Developers do not have to install, setup, patch or manage any software.
  3. High availability and fault tolerance is built-in and no physical administration is required.
  4. SQL Azure Database supports Transact-SQL (T-SQL). Customers can use existing knowledge in T-SQL development and a familiar relational data model for symmetry with existing on-premises databases.
  5. SQL Azure Database can help reduce costs by integrating with existing toolsets and providing symmetry with on-premises and cloud databases.
These statements sounds very promising. Therefor I started creating a SQL Azure database in the cloud to see the current status of the cloud-based relational database service.

First of all you need a SQL Azure account. Request an invitation code for yourself.  Within one day you will receive the invation code which enables you to create your own SQL Azure Server. To create a server you need to specify and Administrator Username and an Administrator Password.

Now your server is created with one database: Master.
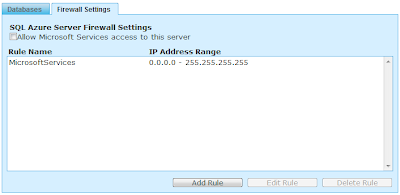
To access this server you need to configure the firewall settings. Press on the Firewall Settings tab and click on checkbox "Allow Microsoft Services acccess to this server". Select the Rule MicrosoftServices and press the Edit Rule button. Now you can specify the range of IP adresses which are allowed to connect to your Azure Server. In my example I have configured all IP addresses.


Now we will create the first database. Select the Databases tab. Press Create Database, Specify a database name and the size of the database. You can choose between 1 Gb and 10 Gb.


Press the Test Connectivity button to test the connection. You MUST have the MicrosoftServices Firewall rule enabled in order to use this feature. Your database is created and you are ready to connect with the SQL Server Management Studio (SSMS). For the Object Explorer you have enter the Server name and Login credentials.


To open a new query you need to specify the database you want to connect. This canbe done in the connection propertie tab. The USE command is not supported for switching between databases. Establish a connection directly to the target database.


Now you are connected.


Enjoy using SQL Azure.

Monday, December 21, 2009

How to drilldown on a reporting server map report in SQL 2008 R2?

In my previous blogpost I described the maps as one of the nice new features of SQL 2008 R2 Reporting Server. These maps can easily be added to your reports if you have a dataset with geography data. In my blogpost: How to enrich your account data with latitude, longitude and geography data? you can add geography data to your dataset. Adding a map in your report for your dataset with geopgraphy data is simple to do. However drilldown or zoom functionality is more difficult to use. This blogpost will explain how you can create maps with drilldown functionality.

The Reporting map control make use of Bing maps which automatically centers and zooms in to the locations of your dataset. To drilldown or zoom we need to start the same report with a smaller dataset. To create a smaller dataset I make use of the data awareness of the reporting map control. When I click on a map point the values of the map point will be used to make the dataset smaller. I created a stored procedure with some parameters. These parameters gets their values from the data awareness of the reporting map control. The stored procedure will drilldown from World, Continent, Country, State to City. I have a table with accounts. Every account has their Countrycode, Statecode and City. I used a Join to the continents table in which every country in the world is linked to a continent. Please download the stored procedure from this location.


  1. Create the stored procedure in your database.
  2. Create a new report
  3. Create a new dataset and select the stored procedure: LocContinentCountryStateCityMap


  4. Report parameters are automatically added to the reports based on the content of the stored procedure: LocContinentCountryStateCityMap.

    Configure all 4 parameters as Hidden and allow NULL values.
    Configure Default value (NULL) for all 4 parameters.


  5. Drag the Map report item to your report. The new map layer wizard is started.


  6. Select SQL Server spatial data.
  7. The wizard will display all datasets with spatial data in it. In this example the resultset of the stored procedure.


  8. Select this dataset and press Next.
  9. Now you get an error: Unable to determine the spatial data type due to connection error. This is correct because the stored procedure need some parameter values which are not known by the wizard. Press OK.
  10. Mark Add a Bing Maps Layer and select a Tile Type: Road.
    Select Layer Type: Point


  11. Press Next and select the Basic Marker Map.
  12. Press Finish.
  13. Now, we have a map with the spatial data and are ready to configure the drilldown functionality.
  14. Drilldown will make use of the data awareness of the reporting map control. Click on a map point and right click with your mouse. Select Point properties. If you get Viewport Properties, you have not select the map point.
  15. Select Action.
    Go to report: Specify the report you are making. Add the 4 parameters to this report action.


    This means the report will start the same report. However with other parameter values. These parameter values are added one by one after every drill down in the stored procedure.

    Now the report is ready to run and drill down.
    Enjoy it.
 

Tuesday, December 1, 2009

How to enrich your account data with latitude, longitude and geography data?

In SQL 2008 R2 one of the new interesting visualization features are the maps. To use the maps for you accounts you need to enrich the account data with geography data. In this blog I will explain how you can enrich your account data with Google geography data by making use of a SQL Server integration packages. To enrich your account data you can make use of Google or BING Maps. I uses Google because:
  • Performance to enrich your account data with geography data is much better than Bing Maps.
  • With Google I can use the GUID, which is the key, in my table as the key. In BING Maps the GUID is not recognized, you need to use an Integer.
To enrich your data via Google you need to have an API key which you can get when you sign up for the Google Maps API. Please read the terms and conditions in which situation you can use this API key. Otherwise you need to use the Google Maps API Premier.


This example is based on an Exact Globe or Exact Synergy database in which the table Cicmpy exists. The Cicmpy table is used to store all account information. In case you want to update account data from another table, some minor extra changes need to be done.  Please execute downloaded script: CreateCicmpyGeoUpdate.SQL This script will add some columns to the Cicmpy table and will create a table to update the geography data by the SSIS package.

  1. Download the CicmpyGeoUpdate.rar Extract the CicmpyGeodataGoogleMaps.dtsx package in folder on your server. The package need to be configured for your environment.
  2. Create a new SSIS project in Microsoft Visual Studio 2008.
  3. Add the CicmpyGeodataGoogleMaps.dtsx package to your project.
  • In the solution explorer, right mouse click on SSIS packages, add existing package)
  • Choose File System as package location and browse to the location where you have downloaded CicmpyGeodataGoogleMaps.dtsx
  • Open the package by double clicking on the package name in the Solution Explorer.
  1. Configure the Connection Manager. The connection manager connection is used by the package to know in which database he needs to enrich the account data.
  • Select GRAA1005-2.ExactGeoTest, right mouse, Edit.
  • Specify your SQL Server and Database name
  • Press Test Connection to test if you can connect to the database.


  1. Configure the package
  • Open the dataflow task. Press on the Data Flow tab.


  • Configure the OLE DB Source connection. Select OLE DB Source, right mouse click, Edit. Check if the correct OLE DB connection manager is selected.

  • In case you are using another table for your account data you need to rewrite the SQL query. Change your table and columns but use the AS Address, AS ZIPCode for the column names of the result set. These columns names are used in the script to recognize the street, zip code etc.
  • Install the Google Maps API key in the Script. Edit Script Component. Select Script Component, right mouse click, Edit.
  • Press the Edit Script button.
  • Open the GeoCode.vb and paste your Google Maps API key between the " "


  • Save the script and build the project and close the project.
  • Configure the OLE DB Destination. Check the configured OLE DB Connection Manager. Select 'Table or View fast load' as Data access mode and select CicmpyGeoUpdate table 


  1. Save the package and you can start the package.
  2. The package will insert all geography data in the table CicmpyGeoUpdate with the GUID of the account as the key. Execute next script to update the account table Cicmpy with all geography data.

    UPDATE Cicmpy
    SET GeographyCol = Geography::Point(CGU.Lat, CGU.Long, 4326),
    Lat=CGU.LAT,Long=CGU.Long,
    Accuracy = CGU.Accuracy
    FROM Cicmpy C
    INNER JOIN CicmpyGeoUpdate CGU ON C.Cmp_wwn = CGU.cmp_wwn
    WHERE CGU.Lat is not NULL
  3. Everytime the package is executed, records are added to the CicmpyGeoUpdate table. After a succesfull update of the account data in step 6 you can truncate the table CicmpyGeoUpdate.

    Truncate table CicmpyGeoUpdate

    Enjoy using geography data. Later on I will post a blog about using geography data with SQL 2008 R2 Reporting Services.